How to Do a Proper Barbell Squat: Complete Form Guide
Most people squat wrong for years without knowing it. Here is how to fix your form, hit depth, and actually build your legs.
Key Takeaways
- Your stance width should match your hip anatomy, not some internet formula - start shoulder-width apart and adjust until you can hit full depth without your heels lifting or knees caving.
- Most people mess up before they even start squatting by setting the bar height wrong and taking too many steps back from the rack - set J-hooks at mid-chest height and only take two steps back.
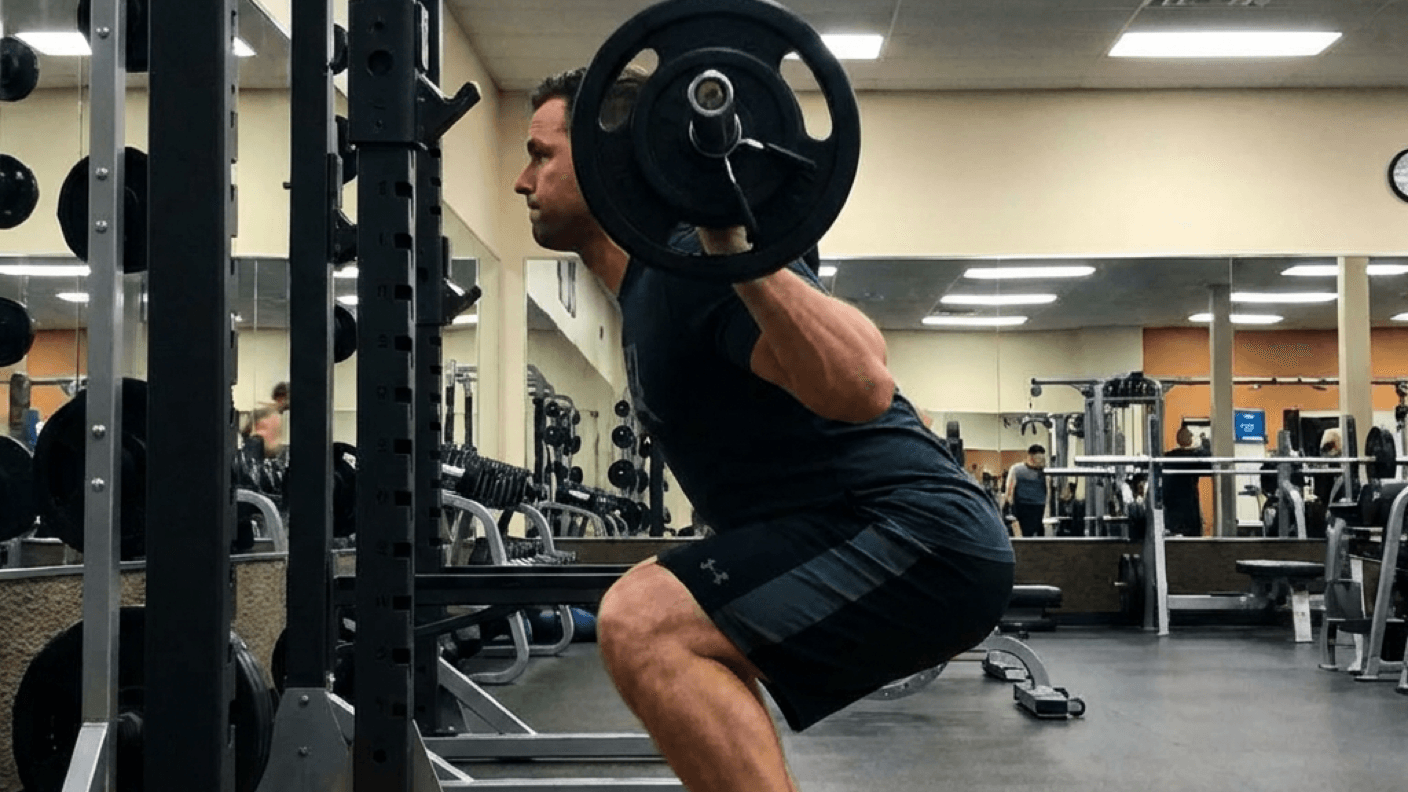
- Break at your hips and knees at the same time while letting your knees track over your toes, and ignore the old myth about knees never going past your toes.
- Hit at least parallel depth where your hip crease reaches the top of your knee, but don't force deeper if your lower back starts rounding at the bottom.
- Take a big breath at the top, hold it during the rep, and exhale at the top to keep your core braced and spine stable under load.
Get This on WhatsApp
Get a quick summary and link sent straight to your WhatsApp.
Send Me This ArticleWhy most people squat wrong
I have been coaching people to squat for over a decade and I can tell you this with confidence: about 80% of the people I see squatting in commercial gyms have at least one major form issue. Some of them have three or four. And the worst part is that most of them have no idea.
They load up 225, do quarter reps with their knees caving in and their heels coming off the ground, then wonder why their knees hurt and their legs never grow. Sound familiar?
The squat is not complicated. It is a basic human movement pattern. Toddlers squat with perfect form. But somewhere between childhood and adulthood, most people lose the mobility and motor patterns required to do it well. Add a barbell to that dysfunction and you get a recipe for mediocre results and eventual injury.
The good news is that fixing your squat is straightforward. It just takes some ego checking and a willingness to drop the weight while you rebuild the pattern.
The setup: before you even unrack
This is where most people already go wrong. They walk up to the bar, duck under it, and just kind of stand up. No thought, no setup, no consistency.
Here is the step-by-step process I teach every single person I coach:
- •Set the J-hooks so the bar sits at about mid-chest height. Too high and you are on your toes unracking. Too low and you are doing a good morning to get it out.
- •Step up to the bar and grab it with both hands. Your grip width depends on your shoulder mobility, but generally you want your hands as close together as is comfortable. A narrower grip creates a tighter upper back shelf for the bar to sit on.
- •Duck under the bar and position it on your back (we will cover high vs low bar in a moment).
- •Plant both feet directly under the bar. Not in front of it, not behind it. Directly under.
- •Take a big breath, brace your core hard (more on this later), and stand straight up to unrack. This should feel easy. If unracking the weight is a struggle, you have the hooks set wrong.
- •Take two steps back. That is it. Two steps. I see people do this shuffle-dance where they take six or seven little steps to get into position. Two steps: one foot back, the other foot back, adjust width if needed. Done.
Bar position: high bar vs low bar
There are two main bar positions for the back squat, and which one you use changes the entire movement.
High bar sits on top of your traps, right at the base of your neck. This is what most people default to and what you see in Olympic weightlifting. High bar keeps your torso more upright, shifts the work more toward the quads, and generally requires better ankle mobility.
Low bar sits across the rear delts, about 2-3 inches lower than high bar. This is what powerlifters typically use. Low bar allows more forward lean, shifts more work to the posterior chain (glutes and hamstrings), and usually lets you move more weight because the lever arm is shorter.
Which should you use? Honestly, for most people just trying to build muscle and get stronger, it does not matter that much. I default to high bar for most of my clients because it is more intuitive, keeps the torso upright (which is safer for people who are still learning), and targets the quads well. If you are interested in powerlifting or you find that low bar feels more natural on your body, go for it.
One thing I will say: if high bar hurts the back of your neck, you probably do not have enough trap development to create a shelf. Build your traps up with shrugs and rows, and in the meantime, use a low bar position or a thin bar pad (the only acceptable use for a bar pad on squats).
Foot placement and stance width
This one drives me crazy because the internet has turned it into this complicated thing with precise angles and measurements. Here is the truth: your stance width and toe angle are determined by your hip anatomy, not by some formula.
Start here:
- •Feet roughly shoulder-width apart or slightly wider
- •Toes pointed out 15-30 degrees
- •Weight distributed across the whole foot, with a slight emphasis on midfoot to heel
Now squat down with just your bodyweight. If your knees track over your toes and you can hit full depth without your heels coming up or your lower back rounding, you found your stance. If not, play with the width and angle until you find a position where you can.
Some people squat best with a narrow stance and toes almost straight ahead. Some people squat best with a wide stance and toes way out. Both are fine. The "correct" stance is the one that lets YOUR hips, knees, and ankles work together through a full range of motion.
A 2018 study by Lahti et al. found that squat stance width had minimal effect on overall muscle activation. Wider stances recruited slightly more adductor, and narrower stances hit slightly more quad, but the differences were small. Pick what feels right and stop overthinking it.
The descent: how to go down correctly
The cue I use with every new squatter: "Sit down between your legs, not back onto a chair."
A lot of people initiate the squat by pushing their hips way back like they are reaching for a toilet seat behind them. This works for low bar squats to a degree, but for high bar and general squatting, you want to think about dropping straight down while your knees push forward and out.
Key cues for the descent:
- •Break at the hips and knees simultaneously. Do not hips-first or knees-first. Both bend at the same time.
- •Push your knees out over your toes. Not past your toes in a dangerous way, just tracking in line with your toe angle. If your toes point out 30 degrees, your knees should track at 30 degrees.
- •Keep your chest up. Think about showing someone the logo on your shirt. If your chest collapses forward, you lose your upper back tightness and the bar starts tipping you forward.
- •Control the speed. Two to three seconds on the way down is fine. You do not need to free-fall into the bottom, but you also should not be doing a 10-second eccentric on every rep. A controlled descent builds tension in the right muscles and keeps you safe.
The biggest mental shift for most people is letting their knees travel forward. There is this old myth that your knees should never pass your toes. This is nonsense. Fry et al. (2003) showed that restricting forward knee travel during squats actually increased torque on the hips and lower back while barely reducing knee forces. Your knees are designed to travel forward. Let them.
Depth: how low should you go
Parallel at minimum. Hip crease at or below the top of the knee. That is the standard and anything above that is a partial rep.
Full depth (often called "ass to grass" or ATG) is when your hamstrings touch your calves. This is fine if you have the mobility for it and can maintain a neutral spine at the bottom. Olympic lifters squat ATG because they need to catch cleans and snatches in a deep position. For general strength and muscle building, going to parallel or slightly below is enough.
What matters more than how deep you go is how you maintain your position at the bottom. If your lower back rounds at the bottom (what lifters call "butt wink"), you are going too deep for your current mobility. Slight lumbar flexion is inevitable and probably not dangerous (research from Schoenfeld 2010 suggests that moderate flexion under load is not as risky as previously believed), but significant rounding under heavy load is a problem over time.
If you cannot hit parallel without your back rounding, work on your ankle mobility and hip mobility before adding weight. Goblet squats with a kettlebell are the best tool for this. Hold a kettlebell at your chest, squat as deep as you can with good form, and sit in the bottom for 5-10 seconds. Do this every day for a few weeks and your depth will improve dramatically.
The ascent: driving out of the hole
This is where the actual work happens.
Drive through your whole foot. Not your toes, not your heels exclusively. Think about pressing the entire foot into the ground like you are trying to push the floor away from you.
Lead with your chest. As you come out of the bottom, your hips and chest should rise at the same rate. If your hips shoot up first while your chest stays down, you just turned your squat into a good morning. This is the most common mistake on heavy squats and it usually means the weight is too heavy or your quads are the weak link.
Push your back into the bar. This cue helps keep your torso angle consistent. Instead of thinking about standing up, think about pushing your upper back into the bar.
Squeeze your glutes at the top. Full hip extension at the top of each rep. Stand all the way up, squeeze your glutes, and lock out. Do not stop short.
One rep done. Reset your breath, brace again, and go for the next one.
Common squat mistakes and how to fix them
Knees caving in (valgus collapse). This is the number one issue I see, especially in women and beginners. Your knees buckle inward at the bottom or on the way up. Fix: lighten the weight, place a light resistance band around your knees, and actively push out against the band during every rep. Also strengthen your hip abductors with banded walks and clamshells.
Heels rising off the ground. Usually an ankle mobility issue. Fix: put small plates (2.5 or 5 pounds) under your heels while you work on ankle mobility. Or buy a pair of weightlifting shoes with a raised heel. They are a legitimate tool, not a crutch.
The "good morning" squat. Your hips shoot up out of the bottom but your chest stays down, turning the squat into a bent-over hip extension. Fix: your quads are weak relative to your posterior chain. Drop the weight, focus on keeping your chest up, and add front squats or leg press to bring up your quads.
Butt wink at the bottom. Your pelvis tucks under at the bottom of the squat, rounding your lower back. Fix: stop going so deep (seriously, parallel is fine), work on hip flexor and ankle mobility, and try widening your stance slightly.
Leaning to one side. One hip drops or you shift your weight to one leg. Fix: this is often a hip mobility or strength asymmetry. Do single-leg work (Bulgarian split squats, lunges) to even things out, and film yourself from behind to check your tracking.
Breathing and bracing
If you take one thing from this entire article, make it this section. Proper bracing is the single most important skill for squatting heavy and staying healthy.
Here is how to brace:
- •Before each rep, take a deep breath into your belly, not your chest. You should feel your stomach expand in all directions, not your shoulders rise up.
- •Once you have that air in, bear down hard. Like you are about to get punched in the gut. Your core should feel like a solid cylinder around your spine.
- •Hold that brace through the entire rep. Do not exhale on the way up (at least not until you are past the sticking point). Exhale at the top, then re-brace for the next rep.
This is called the Valsalva maneuver. It increases intra-abdominal pressure, which stabilizes your spine and lets you transfer force more efficiently. McGill et al. have published extensively on this and the evidence is clear: a braced core protects the spine under load.
If you are using a belt, the belt gives you something to push your abs against, making the brace even tighter. A belt does not replace bracing. It enhances it. If you cannot brace properly without a belt, adding one will not fix the problem.
Programming your squat
How you program the squat depends on your goals and training level, but here are some general guidelines:
| Training level | Frequency | Sets per week | Rep range |
|---|---|---|---|
| Beginner (< 1 year) | 2-3x per week | 9-15 | 5-8 |
| Intermediate (1-3 years) | 2x per week | 8-12 | 3-8 |
| Advanced (3+ years) | 1-2x per week | 6-10 | 1-6 (with accessory work at higher reps) |
Beginners should squat frequently because the movement pattern needs practice. Three times a week with moderate weight is better than once a week with heavy weight. Run a simple linear progression like Starting Strength or GZCLP until you cannot add weight to the bar every session.
Intermediates benefit from some periodization. Weekly progression on a program like Texas Method, 5/3/1, or Juggernaut Method works well. Two squat sessions per week with different rep ranges (one heavy, one lighter/higher volume) gives you practice and stimulus without burning out.
Advanced lifters usually need block periodization. Accumulation phases with higher volume, intensification phases with heavier weight, peaking phases for maximal strength. If you are at this level, you probably already know what works for your body, or you should be working with a coach who does.
Regardless of your level, the squat should be the first exercise in your session. You want to be fresh for the most technically demanding and systemically fatiguing movement. Do not squat after 45 minutes of leg extensions and leg curls. Squat first, then do your accessories.
Frequently Asked Questions
- How deep should I squat with a barbell?
- At minimum, your hip crease should drop below the top of your knee. That is parallel. Going slightly below parallel is even better for quad and glute activation. If you cannot hit depth, it is almost always an ankle mobility or hip mobility issue, not a strength issue.
- Should I squat with a wide or narrow stance?
- Use whatever stance lets you hit depth comfortably with your torso relatively upright. Most people do well with feet slightly wider than shoulder width, toes pointed out 15-30 degrees. Your hip anatomy determines your best stance, not some cookie-cutter rule.
- Why do my knees cave in when I squat?
- Knee cave is usually weak glute medius muscles, not weak knees. Focus on pushing your knees out over your toes throughout the movement. Adding banded squats as a warm-up drill teaches your glutes to fire and fixes this problem fast.
- Where should I put the bar for squats?
- High bar (on your traps) is more quad-dominant and keeps your torso upright. Low bar (on your rear delts) lets you move more weight and uses more posterior chain. Neither is wrong. Try both and use whichever feels natural and lets you hit depth.
- Is it bad if my knees go past my toes when squatting?
- No, this is a myth that will not die. Your knees going past your toes is completely normal, especially if you have long femurs or do high-bar squats. Forcing your knees to stay behind your toes shifts more stress to your lower back, which is actually worse.