How to Use Lifting Straps, Belts, and Wraps Correctly
Lifting accessories can make you stronger and safer, or they can become a crutch. Here is when to use them, when to skip them, and how to use them right.
Key Takeaways
- Use lifting straps when your grip gives out before your target muscles during heavy pulling movements like deadlifts and rows.
- A lifting belt doesn't weaken your core, it actually increases core activation by giving your abs something to push against.
- Wear your belt snug but not so tight that you can't take a deep breath and expand your stomach into it.
- Save gear for your heaviest working sets and train raw on warm-ups and lighter weights to build natural strength.
- Wrist wraps are for pressing movements when your wrists hurt, not for general support or every single exercise.
Get This on WhatsApp
Get a quick summary and link sent straight to your WhatsApp.
Send Me This ArticleThe gear debate: crutch or tool
Every gym has that one guy who wraps himself in more equipment than a medieval knight before doing a set of bicep curls. Belt, straps, wraps, sleeves, chalk, smelling salts. The whole production.
And every gym also has that hardliner who refuses to use anything, insisting that "real lifters" train with nothing but bare hands and willpower.
Both positions are stupid. Lifting accessories are tools. Like any tool, they are useful when applied correctly and pointless when misused. A hammer is great for nails and useless for screws. Same logic applies to belts, straps, and wraps.
The key question for any piece of equipment is: does this allow me to train the target muscle harder or safer without creating a long-term dependency? If yes, use it. If no, skip it.
Let me go through each piece of common gym equipment and give you the actual practical guidance.
Lifting straps: what they do and when to use them
Lifting straps wrap around the barbell and your wrist, creating a secure connection between your hand and the bar. They effectively take your grip strength out of the equation.
When to use straps:
- •Heavy deadlifts, rows, or shrugs where your grip fails before your back does
- •Romanian deadlifts and other hamstring exercises (these are hamstring exercises, not grip exercises)
- •Pull-ups or lat pulldowns if grip is a limiting factor
- •Any pulling movement where you want to focus on the target muscle without grip fatigue interfering
When NOT to use straps:
- •Warm-up sets (build your grip on lighter weights)
- •Competition deadlifts (straps are not allowed in powerlifting)
- •Every single set of everything (your grip needs some training too)
Here is my approach and what I recommend to the people I coach: do your warm-up sets and first 1-2 working sets without straps. Let your grip do the work when it can. Then strap up for your heaviest sets where grip would otherwise be the limiting factor.
This way you are training your grip every session but not letting it hold back your back development. Your lats can handle way more weight than your fingers can hold. It makes no sense to limit your lat training because your grip gives out at rep 6 of a set of 10.
I had a client who refused to use straps for two years because someone told him they were "cheating." His deadlift stalled at 365 because his grip would fail. We added straps on his top sets and within three months his deadlift was at 405. His grip strength actually improved too, because he was now pulling heavier weights for longer (even with straps, your hands still work, they just get help).
Types of lifting straps
Lasso straps (standard lifting straps): The most common type. A loop of nylon or cotton with a long tail. You thread the tail around the bar and wrap it. These work for everything and cost about 10-15 bucks. If you are buying your first pair of straps, get these.
Figure-8 straps: A figure-8 shaped strap that loops around your wrist and the bar without wrapping. You literally step into them. They provide the strongest grip assistance and are popular with strongman competitors and heavy deadlifters. The downside is that you cannot quick-release them, which means if you need to bail on a lift, the bar comes with you. I would avoid these unless you specifically need maximum grip security for heavy pulls.
Hook straps (Versa Gripps and similar): A strap with a built-in hook or rubber pad that grabs the bar. These are fast and convenient (no wrapping required) but do not provide as much grip support as lasso or figure-8 straps. Good for bodybuilding-style training where you are not maxing out.
My recommendation: Standard lasso straps. Simple, cheap, effective. Learn to wrap them quickly (it takes practice) and they will serve you well for years.
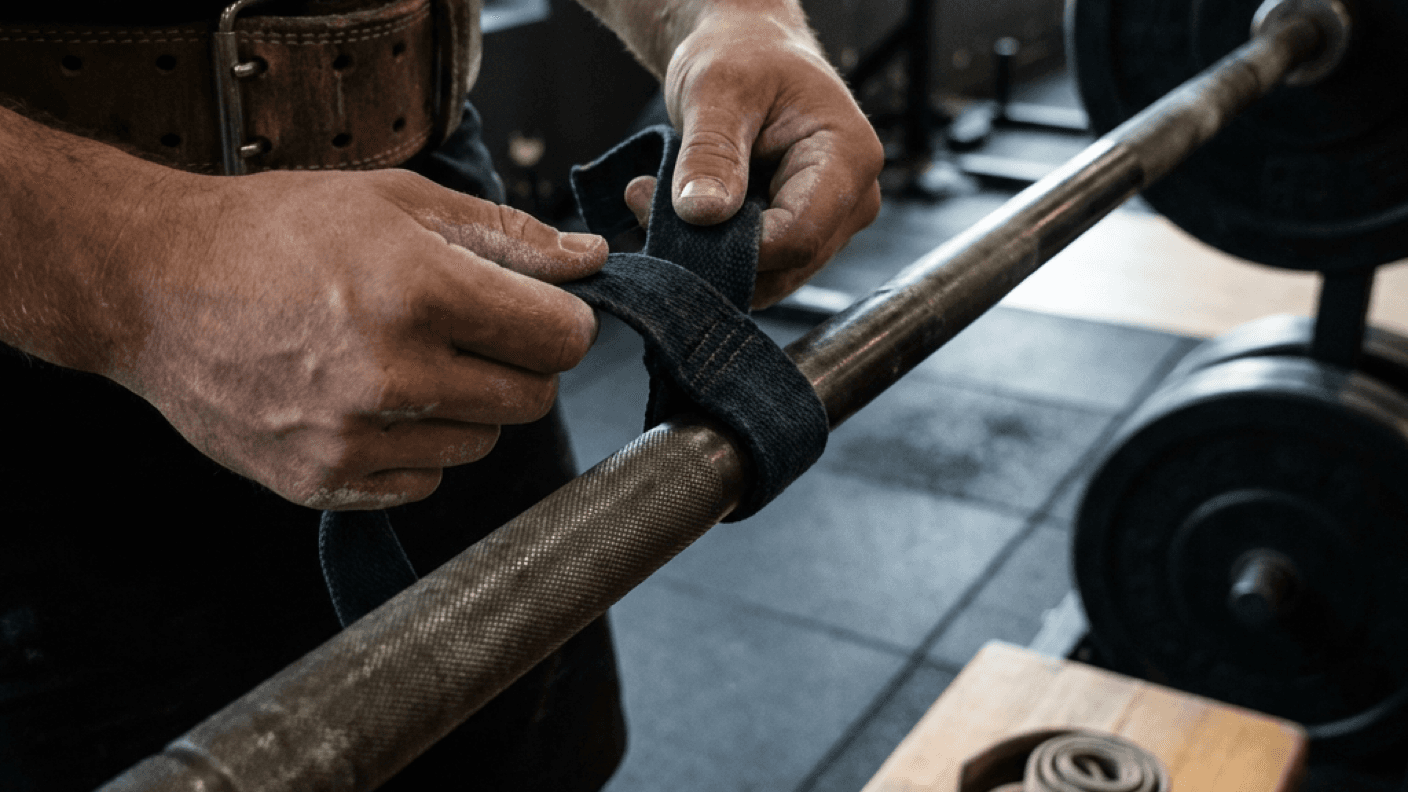
How to wrap lasso straps:
- •Put the loop around your wrist.
- •Thread the tail UNDER the bar, then wrap it AROUND the bar in the direction that tightens when you pull.
- •Grab the bar over the wrapped strap.
- •Roll your wrist down to tighten the strap against the bar.
- •Pull. The strap should tighten as you pull, not loosen.
The most common mistake is wrapping the strap the wrong direction, so it loosens when you pull. If the strap feels like it is unwrapping during your set, you wrapped it backwards. Flip the direction.
Lifting belts: the most misunderstood piece of gym equipment
There are more myths about lifting belts than almost anything else in the gym. Let me clear the big ones up:
Myth: Belts weaken your core.
Wrong. A belt does not do the work for your core. It gives your abs something to push against, which actually INCREASES intra-abdominal pressure and core activation. Kingma et al. (2006) found that belt use increased intra-abdominal pressure by approximately 15-25% during heavy lifting. Your core works harder with a belt, not less.
Myth: You should not use a belt until you can squat/deadlift X amount.
There is no magic number. If you are lifting heavy enough that bracing is important (for most people, once the weight gets challenging in the 3-8 rep range), a belt can help. That might be 135 for some people and 315 for others.
Myth: Belts prevent injuries.
Not directly. A belt helps you brace more effectively, which stabilizes your spine. But a belt cannot compensate for garbage technique. If your form is bad, a belt just lets you lift more weight with bad form, which is worse.
What a belt actually does: It provides a surface for your abdominal muscles to push against during the Valsalva maneuver. This increases intra-abdominal pressure, which increases spinal stability. Think of it like the difference between pressing your hand against a wall vs pressing against air. The wall (belt) gives you something to push against, which lets you generate more force.
How to wear and use a lifting belt
Position: The belt sits on your torso, NOT on your hips and NOT on your rib cage. It should cover the area from just above your hip bones to just below your lower ribs. The exact position varies by body type. Some people wear it slightly higher for deadlifts and slightly lower for squats. Experiment.
Tightness: This is where most people mess up. The belt should be snug but not so tight that you cannot take a full breath into your belly. You need to be able to expand your abdomen into the belt. If the belt is cranked down so tight that you cannot breathe, it is too tight and you are defeating the purpose.
A good test: put the belt on, take a deep belly breath, and try to push your stomach out in all directions against the belt. You should feel resistance from the belt but you should be able to expand into it. If you cannot expand at all, loosen it a notch.
The bracing sequence:
- •Take a big breath into your belly (diaphragmatic breathing, not chest breathing).
- •Push your abs out against the belt in all directions: front, sides, and back.
- •Hold that brace through the entire rep.
- •Exhale at the top, re-brace, go again.
This is the same bracing technique you use without a belt, just amplified. The belt gives you tactile feedback (you can feel yourself pushing against it) and allows you to generate more pressure.
Choosing the right belt
10mm vs 13mm thickness: 10mm is more comfortable and breaks in faster. 13mm is stiffer and provides more support but takes weeks to break in and feels like wearing a wooden barrel at first. For most recreational lifters, 10mm is plenty. If you are squatting over 400 or deadlifting over 500, the 13mm starts to make more sense.
Lever vs prong: Lever belts are fast to put on and take off (flip the lever). Prong belts are slower but you can micro-adjust the tightness by changing which hole you use. Single prong is easier than double prong. I personally use a lever belt because the convenience is worth it, but plenty of strong people use prong belts.
Width: A standard powerlifting belt is 4 inches wide all the way around. Some "bodybuilding" belts taper in the front to 2-3 inches. Get the 4-inch belt. The wider front provides more surface area for your abs to push against, which is the whole point.
Material: Leather belts are the gold standard. They last decades if you take care of them. Pioneer, Inzer, SBD, and Rogue all make excellent leather belts in the 80-150 dollar range. Nylon velcro belts are cheaper (20-40 dollars) and work fine for lighter training, but they do not provide the same level of support as leather.
If you are serious about lifting and plan to squat and deadlift for years, invest in a good leather belt. You will only buy one.
Wrist wraps: when your wrists need help
Wrist wraps are strips of stiff fabric that wrap around your wrist to provide support and limit extension. They are primarily used for pressing movements: bench press, overhead press, and dips.
When to use wrist wraps:
- •Heavy bench press or overhead press where your wrists bend back under the load
- •If you have a history of wrist pain during pressing
- •If your wrist flexibility is limited and you cannot keep a neutral wrist position
When NOT to use wrist wraps:
- •Light pressing sets (let your wrists handle the load when it is manageable)
- •Pulling exercises (wraps do nothing here, use straps instead)
- •Curls (if curls hurt your wrists, switch to an EZ-bar or hammer grip)
How to wrap them: Wrap starting from just below the wrist joint, covering the joint itself, and extending slightly onto the hand. The wrap should prevent your wrist from bending backward. Most wraps have a thumb loop to anchor the starting position, then you wrap 2-3 times around the wrist and velcro it shut.
Wrap stiffness matters: Wrist wraps come in different stiffness levels. Flexible wraps provide light support and are comfortable. Stiff wraps (competition-grade) are like putting your wrist in a cast. For most gym training, a medium-stiffness wrap is the sweet spot. Save the ultra-stiff wraps for competition bench pressing.
Knee wraps vs knee sleeves
These are two completely different products that people constantly confuse.
Knee sleeves are made of neoprene and slide over your knee like a tube. They provide warmth, mild compression, and a small amount of proprioceptive feedback (your brain gets a better sense of where your knee is in space). They do NOT significantly add weight to your squat.
Knee sleeves are great for:
- •Keeping your knees warm during training (especially in cold gyms)
- •Mild joint support for people with cranky knees
- •Making squats and lunges feel more comfortable
Most lifters should probably wear knee sleeves for squatting. They are inexpensive (30-60 dollars for a good pair), last for years, and the mild compression and warmth genuinely helps. SBD, Rehband, and Stoic all make good ones.
Knee wraps are long elastic bandages that wrap tightly around the knee. They store elastic energy at the bottom of the squat and release it on the way up, essentially turning your knee into a spring. Good knee wraps can add 30-80 pounds to a squat. They are used in "equipped" powerlifting and by some strongman competitors.
Knee wraps are NOT for general gym use. They are uncomfortable, they alter squat mechanics (you tend to sit back more), and they can actually increase stress on the patella if used improperly. Unless you are competing in a federation that allows knee wraps, stick with sleeves.
When to use gear and when to go raw
Here is my general framework:
| Equipment | Use on | Skip on |
|---|---|---|
| Lifting straps | Top sets of pulls, RDLs, heavy rows, shrugs | Warm-ups, light sets, exercises where grip training is the goal |
| Lifting belt | Working sets of squats, deadlifts, overhead press, barbell rows | Warm-ups, machine exercises, anything under RPE 6 |
| Wrist wraps | Heavy bench, heavy overhead press | Light pressing, pulling exercises |
| Knee sleeves | All squatting and leg pressing | Upper body days |
| Knee wraps | Competition only | Everything else |
| Chalk | Any set where grip matters | You are already wearing straps |
The general principle: Warm up and do your lighter sets without gear. Add gear as the weight gets heavier. This ensures you are building baseline strength and stability without equipment while using tools to push your top-end performance.
One thing I want to stress: none of this equipment is "cheating." A belt does not squat the weight for you. Straps do not row the weight for you. They are tools that allow your target muscles to be trained harder without being limited by weaker links in the chain. That is smart training, not cheating.
The only time equipment becomes a problem is when someone cannot train without it. If you absolutely need a belt to squat 135, that is a core strength issue you need to address. If you need straps to row 95 pounds, that is a grip strength issue. Use the gear strategically, not as a default for every set of everything.
Frequently Asked Questions
- Should beginners use a lifting belt?
- Not for the first 6-12 months. Learn to brace your core properly without a belt first. Once you are squatting around 1.5 times your body weight and deadlifting close to double, a belt can help you lift more safely at those heavier loads.
- Do lifting straps make your grip weaker?
- Only if you use them for every set of every exercise. Use straps for your heaviest deadlift sets when grip is the limiting factor, but do your warm-up and lighter sets without them. This way you build grip strength and still get the benefit of going heavy.
- When should I use wrist wraps?
- Wrist wraps help when heavy pressing causes wrist discomfort, typically once you are benching over 185 or overhead pressing over 135. They provide stability, not strength. If your wrists are fine without them, you do not need them.
- Are lifting belts cheating?
- No. A belt does not lift the weight for you. It gives your core something to brace against, which increases intra-abdominal pressure and lets you produce more force safely. Every serious powerlifter and most strong people use a belt for heavy sets.